
This well known photograph of the Waratah is used by just about every blogger that has written articles on the ship, it was taken on or about the 5th of July 1909 prior to her moving to the Adelaide outer berth to top up cargo before sailing on the 7th of July for Durban. In this photo we see almost all of her starboard side, while at this berth another photo was taken from across the river showing her port side in full length.

Port side view of Waratah.
Please note while there is no known copy write on these two pictures of the ship, I have created separate enhanced views which are newly created photographs and therefore hold copy write to these new photographs which are my own creation.
The object of my exercise is to try and bring to life parts of the Waratah and persons contained therein in order to give the reader a more practical view of the ship and bring it to life as she was in 1909.
VIEWS OF THE PORT SIDE.

Two crewman painting the funnel, note paint pot hanging from the man on the right.

Red square shows a crewman at a fresh water header tank on the boat deck , probably topping it up from the shore supply. These tanks were gravity fed to the temporary built wash closets down below on deck for use by tween deck immigrant passengers and were only turned on for a short period in the mornings.
Yellow square shows four glass ports in boiler room skylight, the skylight is opened fully to catch a breeze to help cool the air below.
Blue square shows a casual observer leaning on the rail taking in the sights across the river.
Note no Plimsoll markings on side of ship in midships section at the waterline, free board was determined by manual measurement, an exercise which I have carried out on many occasions when conducting surveys.
 Red circle shows the crane man on hatch number 1 with his left arm in the air, he directs the man driving the winch by signals to lower or raise the cargo either going in or out of the hold .
White rectangle shows the faint outline of the name Waratah, the light is against the camera.
Blue arrow shows the ship has ample draft at the waterline at this stage.
Yellow rings show water ballast being discharged.

Aft Section.
Red square shows either crew members or stevedores taking a break and possibly fishing.
Yellow arrow shows a boat, (Cutter), used as a service boat when at anchor or, lowered rapidly in case of a man overboard, there are no chocks and the boat only needs to be swung out.
VIEWS OF THE STARBOARD SIDE OF WARATAH.
 Are there any living relatives that may recognize these two crew members on the bow. I have managed to match them up to a group photo of the crew shown below.

The officer circled with a blue ring is the chief engineer Mr. George Hodder.

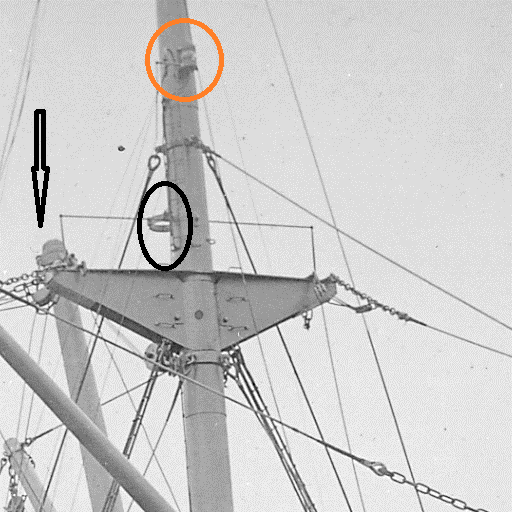
The black arrow indicates the steam windlass for dropping anchors weighing anchors.
The orange oval is the ships bell on the fore deck used by the officer in charge of anchoring. The ship is equipped with 3 bells, the bridge bell for ringing out the watches and the crows nest bell for the lookout to alert the bridge of any dangers ahead. It is rung to inform the bridge how much chain is let out or taken in and is struck when 15 fathoms of chain or one shackle 90 feet passes out marked by white paint which is easy to see in the dark.
The black rectangle shows crutches for the ships derricks to lay in and lashed down when at sea.
 The black oval circle shows the halyard lines which are used when the ship is at anchor and a black shape or ball is hoisted to show she is at anchor in daylight hours.
The blue square highlights the Blue Anchor Line flag flown from the jack staff.
 The orange circle shows the fore mast white light.
The black arrow shows the end of the 20 ton lift derrick which was stowed vertically against the fore mast at sea.
The black circle shows the retaining collar that secured the derrick to the mast. It was this derrick that the boatswain threatened to leave the ship at Adelaide with other seamen if it was not laid down. He said "we don't need all that extra weight high up in the air." This indicated that the sailors knew how tender the ship really was and were frightened of her.
 The yellow rings show two seamen working on the funnel.
The blue rectangle shows the compass binnacle on the monkey platform, the cover is taken off for navigating officers to take bearings by compass and also to check compass error by the sun.
The red circle shows a short man overlooking cargo operations, possibly Captain Ilbery who was a very short and walked with a limp.
 The yellow outline shows a quartermaster on gangway duty facing the camera with an officer at the head of the gangway with his back to the camera.
The white rectangle shows a coal loading door open by which coal is is loaded into a chute or scuttle. These doors have to be re caulked or sealed and made secure prior to sailing.
The red square indicates two ladies returning to the ship possibly the two stewardess Emma Swan and Sarah E Whitehorn after a visit ashore.

 The crows nest with the red circle showing the warning bell.


T
Please note while there is no known copy write on these two pictures of the ship, I have created separate enhanced views which are newly created photographs and therefore hold copy write to these new photographs which are my own creation.
The object of my exercise is to try and bring to life parts of the Waratah and persons contained therein in order to give the reader a more practical view of the ship and bring it to life as she was in 1909.
VIEWS OF THE PORT SIDE.

Two crewman painting the funnel, note paint pot hanging from the man on the right.

Red square shows a crewman at a fresh water header tank on the boat deck , probably topping it up from the shore supply. These tanks were gravity fed to the temporary built wash closets down below on deck for use by tween deck immigrant passengers and were only turned on for a short period in the mornings.
Yellow square shows four glass ports in boiler room skylight, the skylight is opened fully to catch a breeze to help cool the air below.
Blue square shows a casual observer leaning on the rail taking in the sights across the river.
Note no Plimsoll markings on side of ship in midships section at the waterline, free board was determined by manual measurement, an exercise which I have carried out on many occasions when conducting surveys.

White rectangle shows the faint outline of the name Waratah, the light is against the camera.
Blue arrow shows the ship has ample draft at the waterline at this stage.
Yellow rings show water ballast being discharged.

Aft Section.
Red square shows either crew members or stevedores taking a break and possibly fishing.
Yellow arrow shows a boat, (Cutter), used as a service boat when at anchor or, lowered rapidly in case of a man overboard, there are no chocks and the boat only needs to be swung out.
VIEWS OF THE STARBOARD SIDE OF WARATAH.

The officer circled with a blue ring is the chief engineer Mr. George Hodder.

The black arrow indicates the steam windlass for dropping anchors weighing anchors.
The orange oval is the ships bell on the fore deck used by the officer in charge of anchoring. The ship is equipped with 3 bells, the bridge bell for ringing out the watches and the crows nest bell for the lookout to alert the bridge of any dangers ahead. It is rung to inform the bridge how much chain is let out or taken in and is struck when 15 fathoms of chain or one shackle 90 feet passes out marked by white paint which is easy to see in the dark.
The black rectangle shows crutches for the ships derricks to lay in and lashed down when at sea.

The blue square highlights the Blue Anchor Line flag flown from the jack staff.
The black arrow shows the end of the 20 ton lift derrick which was stowed vertically against the fore mast at sea.
The black circle shows the retaining collar that secured the derrick to the mast. It was this derrick that the boatswain threatened to leave the ship at Adelaide with other seamen if it was not laid down. He said "we don't need all that extra weight high up in the air." This indicated that the sailors knew how tender the ship really was and were frightened of her.

The blue rectangle shows the compass binnacle on the monkey platform, the cover is taken off for navigating officers to take bearings by compass and also to check compass error by the sun.
The red circle shows a short man overlooking cargo operations, possibly Captain Ilbery who was a very short and walked with a limp.

The white rectangle shows a coal loading door open by which coal is is loaded into a chute or scuttle. These doors have to be re caulked or sealed and made secure prior to sailing.
The red square indicates two ladies returning to the ship possibly the two stewardess Emma Swan and Sarah E Whitehorn after a visit ashore.

